Welcome to your go-to blogger for Arduino and ESP32 projects! We focus on educational builds, guiding you through the entire setup and explaining how it works. Every project includes complete schematics and open-source code, so you can recreate it yourself!
OVERVIEW: arduino web server sd card esp8266 web server sd card esp32 sd card web server esp8266 sd card web server nodemcu sd card web server esp8266 dht22 web server esp8266 dht11 web server How to Make a Graph Chart in Google Sheets sd in web server graph sd card arduino example sd card arduino tutorial read sd card arduino arduino csv sd card arduino sd card data arduino sd card excel arduino read from sd card arduino ftp server sd card sd card for arduino arduino micro sd card module arduino string to char array char en arduino string to char arduino arduino char to string Operating voltage: 3.3V volts.
In this Arduino Tutorial we will learn how to use MFRC522 RFID & SD Card with esp8266
OVERVIEW: esp8266 rfid reader, esp8266 rfid rc522, nodemcu esp8266 rfid, nodemcu esp8266 rfid rc522, rfid with esp8266, sd arduino tutorial, carte sd arduino, micro sd arduino, Operating voltage: 3.3V volts.
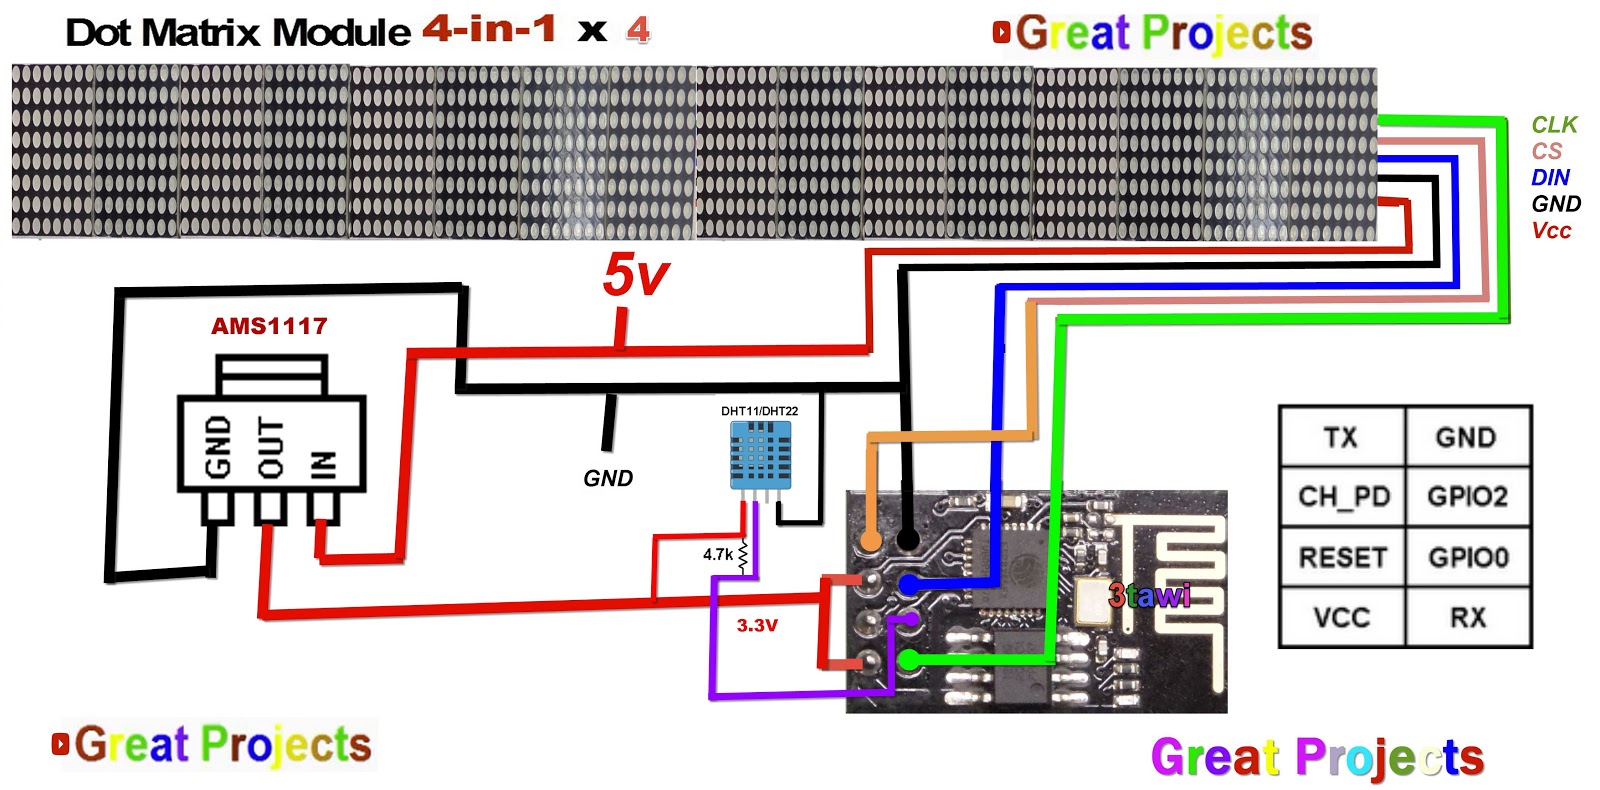
In this instructable we are going to learn how to monitor the temperature and the humidity measurements using the IOT-MCU/ESP-01-DHT11, MAX7219 LED matrix display.
ESP-01 OVERVIEW: The ESP-01 is a small size black colored module with 1M memory. The ESP8266 is a low-cost WiFi module with full TCP/IP stack. The ESP8266 series are produced by Espressif Systems. Operating voltage: 3.3V volts.
IOT-MCU ESP-01-DHT OVERVIEW: Controller: ESP-01 / ESP-01S (To buy separately) Temperature and humidity sensor: DHT11 Operating voltage: DC 3.7V-12V (It supports 3.7V lithium battery power supply) Measuring range: 20-90% RH 0-50 ?, Measurement accuracy: Temperature ± 2 ?, Humidity ± 5% RH.
// REQUIRES the following Arduino libraries: // - CT1642 library: https://github.com/arkroan/CT1642 // - RTC DS1307 Library: https://github.com/MajicDesigns/MD_DS1307 // - IRremote library can be found at https://github.com/z3t0/Arduino-IRremote // Find All "Great Projects" Videos : https://www.youtube.com/channel/UCCC8DuqicBtP3A_aC53HYDQ/videos
ESP8266 ultrasonic distance measuring Displayed on MAX7219 Dot Matrix
In this Arduino Tutorial we will learn how the HC-SR04 Ultrasonic Sensor works and how to use it with the Arduino Board. You can watch the following video or read the written tutorial below.
The HC-SR04 Ultrasonic Module has 4 pins, Ground, VCC, Trig and Echo. The Ground and the VCC pins of the module needs to be connected to the Ground and the 5 volts pins on the Arduino Board respectively and the trig and echo pins to any Digital I/O pin on the esp8266
// - REQUIRES the following Arduino libraries: // - MD_Parola Library: https://github.com/MajicDesigns/MD_Parola // - MD_MAX72XX library can be found at https://github.com/MajicDesigns/MD_MAX72XX // - HCSR04 library: https://github.com/Martinsos/arduino-lib-hc-sr04 // - More videos : https://www.youtube.com/channel/UCCC8DuqicBtP3A_aC53HYDQ/videos
// includes
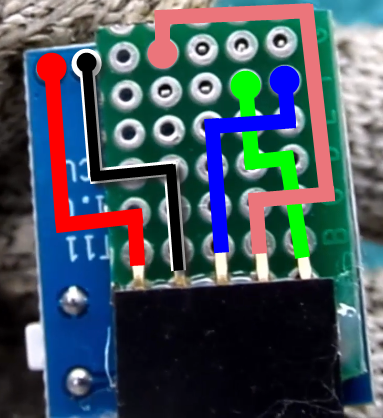
#include <ESP8266WiFi.h> #include <MD_Parola.h> #include <MD_MAX72xx.h> #include <SPI.h> #include <HCSR04.h> UltraSonicDistanceSensor distanceSensor(12, 4); // Initialize sensor that uses digital pins 13 and 12. #define HARDWARE_TYPE MD_MAX72XX::FC16_HW #define MAX_DEVICES 3
#define CLK_PIN 14 // or SCK #define DATA_PIN 13 // or MOSI #define CS_PIN 15 // or SS
In this Arduino Tutorial we will learn how the MQ 135 Sensor works and
how to use it with the Arduino Nano v3 Board. You can watch the
following video or read the written tutorial below.
ultrasonic sensor arduino distance measuring Displayed on MAX7219 Dot Matrix
In this Arduino Tutorial we will learn how the HC-SR04 Ultrasonic Sensor works and how to use it with the Arduino Board. You can watch the following video or read the written tutorial below.
The HC-SR04 Ultrasonic Module has 4 pins, Ground, VCC, Trig and Echo. The Ground and the VCC pins of the module needs to be connected to the Ground and the 5 volts pins on the Arduino Board respectively and the trig and echo pins to any Digital I/O pin on the Arduino Board.